Faust Tutorials
This page gathers various tutorials around the Faust programming language and some of its associated tools. This is an ongoing project and it will soon be populated with more elements.
Should you have any question, feel free to send an e-mail to the Faust user mailing list.
Adding Faust DSP Support to Your JUCE Plug-ins
JUCE is a well-known framework for creating audio plug-ins (i.e., VST, AU, AAX, etc.) and applications for a wide range of platforms. Faust can be used to generate ready-to-use JUCE applications and plug-ins implementing the standard user interface (UI) described in the Faust code using faust2juce. However, it is sooo easy to make professional looking UIs from scratch in JUCE that you might want to use Faust to implement the DSP portion of your plug-in and build your own UI.
In this tutorial, we demonstrate how to use faust2api to generate a JUCE audio engine from Faust and how to interface it with your JUCE plug-in/UI. We’ll cover basic examples as well as more advanced applications involving polyphony, etc.
“The Old Way”: Brute-Force Method
If you’re not interested by this brief page of history, you can jump directly to the next section.
Before faust2api existed, it was already possible to use Faust to implement the DSP portion of a JUCE plug-in. Indeed, the most basic way to use Faust is to generate C++ code with the Faust compiler. Running:
faust someCode.dsp -o someCode.cppwill output a C++ file (someCode.cpp) containing a class implementing a ready-to-use audio callback (see this tutorial). Hence, it was just a matter of using this class in your JUCE project, pass it the input buffers, retrieve the output buffers, and change potential parameters, etc. This short (and potentially outdated) tutorial from 2016 demonstrates how this can be done.
Fortunately, things are simpler than ever nowadays and faust2api greatly simplifies this process.
Simple Synth Plug-In
<< Download the source of this tutorial >>
In this section, we demonstrate how to use a Faust synth to build a plug-in in JUCE with a custom UI from scratch.
This tutorial only demonstrates how to make a JUCE plug-in. Making a JUCE standalone application following the same method is perfectly possible with some adjustments.
Generating the DSP Engine
First, let’s implement a basic subtractive synthesizer in Faust based on a filtered sawtooth wave (synth.dsp):

import("stdfaust.lib");
freq = nentry("freq",500,200,1000,0.01);
gain = nentry("gain",0.5,0,1,0.01) : si.smoo;
gate = button("gate") : si.smoo;
cutoff = nentry("cutoff",10000,50,10000,0.01) : si.smoo;
process = os.sawtooth(freq)*gain*gate : fi.lowpass(3,cutoff) <: _,_;Feel free to run it in the web editor to see how it sounds!
The output of the lowpass is split into 2 signals to create a stereo object.
Note that all the parameters are smoothed to prevent clicking (we want our plug-in to be clean!). Even gate is smoothed, which will apply a gentle exponential envelope when the trigger signal is sent, etc.
Since Faust will not build its own UI here, the type of UI element used in this code doesn’t really matter. They just serve as a point of entry to control the parameters of the audio engine we’re about to generate. So nentry could be replaced by hslider or vslider, it would not make any difference. However, we encourage you to always write “coherent” interfaces in case someone would like to use your Faust code “as such” at some point.
This Faust program can be turned into an audio engine for JUCE simply by running the following command (assuming that Faust is properly installed on your system):
faust2api -juce synth.dspAlternatively (i.e., if you’re an unfortunate Windows user), you can use the Faust web editor to carry out the same task by choosing source/juce in the export function (don’t forget to change the name of your Faust program to synth.dsp in the drop area).
In both cases, you’ll end up with with a zip file containing a C++ file and its companion header file as well as some automatically generated markdown documentation.
Creating an Empty JUCE Plug-In Project
In this section, we’ll assume that you’re a bit familiar with JUCE. If that’s not your case, don’t panic and just read their Getting started with the Projucer tutorial. We also recommend you to have a look a the next few following tutorials to have a sense of how things work. They’re nice and easy to read!
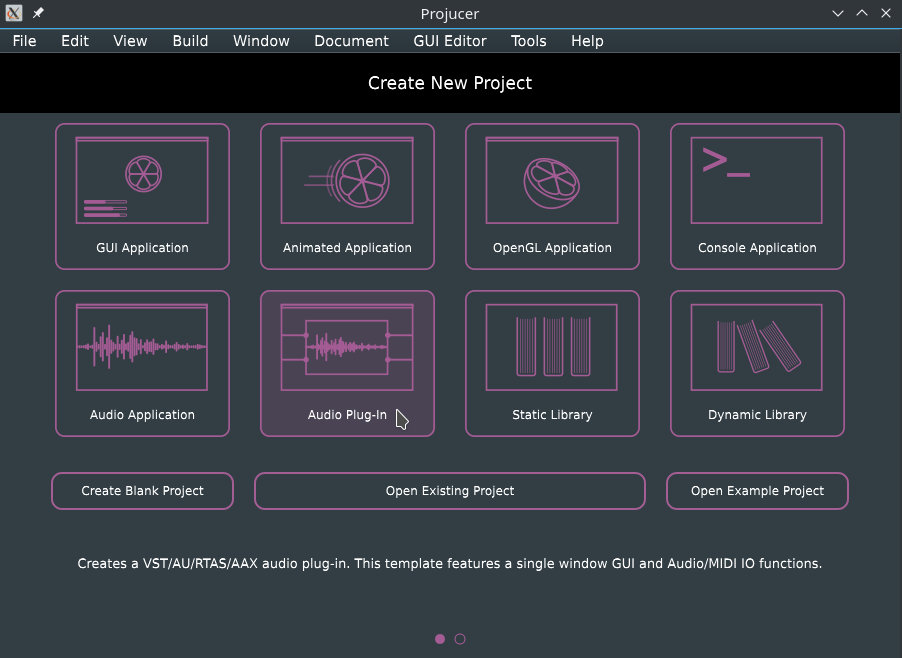
In the Projucer, create a new Audio Plug-In, add the targets that you want, in the settings, make sure that “Plugin is a Synth” is enabled. In our case, we named it “SawtoothSynth” (choose this name wisely as it will impact the class names of your program).
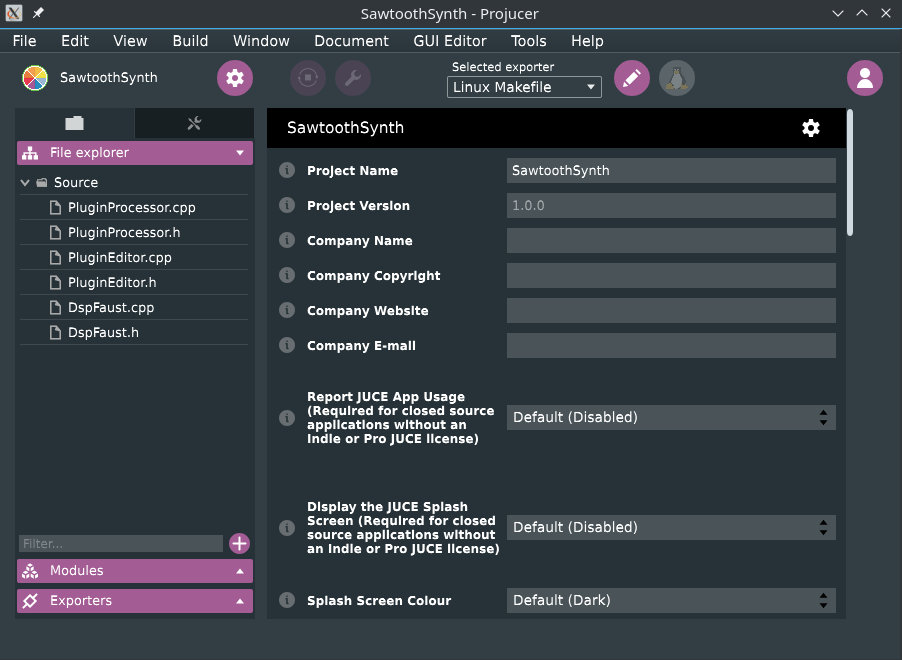
Now, place DspFaust.cpp and DspFaust.h generated in the previous step in the Source folder of your JUCE plug-in project. Then select these 2 files in Source and drag them in the Projucer so that they become visible in the Source tab:
At this point, try to compile your plug-in and see if it runs. Remember that JUCE now generates a “standalone plug-in” by default which is super convenient to test things without having to open the plug-in in a third party application.
Let’s now add our DspFaust object to the PluginProcessor. In PluginProcessor.h, include DspFaust.h:
#include "../JuceLibraryCode/JuceHeader.h"
#include "DspFaust.h"
and implement DspFaust in the private section of the AudioProcessor class:
private:
    DspFaust dspFaust;

    //==============================================================================
    JUCE_DECLARE_NON_COPYABLE_WITH_LEAK_DETECTOR (SawtoothSynthAudioProcessor)
In PluginProcessor.cpp, all we have to do is to call dspFaust.start() when we want to start the Faust audio engine and dspFaust.stop() when we want to stop it. No need to set the sampling rate or the buffer length, dspFaust takes care of that for ya.
Remember that the package generated by
faust2apicontains a documentation of the generated API. Feel free to have a look at it to get a sense of what methods are available.
dspFaust.start() and dspFaust.stop() can be conveniently placed in the constructor and destructor (respectively) of SawtoothSynthAudioProcessor:
SawtoothSynthAudioProcessor::SawtoothSynthAudioProcessor()
#ifndef JucePlugin_PreferredChannelConfigurations
     : AudioProcessor (BusesProperties()
                     #if ! JucePlugin_IsMidiEffect
                      #if ! JucePlugin_IsSynth
                       .withInput  ("Input",  AudioChannelSet::stereo(), true)
                      #endif
                       .withOutput ("Output", AudioChannelSet::stereo(), true)
                     #endif
                       )
#endif
{
  dspFaust.start();
}

SawtoothSynthAudioProcessor::~SawtoothSynthAudioProcessor()
{
  dspFaust.stop();
}
The default JUCE plug-in copies the input buffer in the output buffer. Therefore, make sure that the implementation of the processBlock method looks like:
void SawtoothSynthAudioProcessor::processBlock (AudioBuffer<float>& buffer, MidiBuffer& midiMessages)
{
}
(empty).
We now want to control the parameters of our dspFaust object. For that, the setParamValue method can be used. Since we want to control the parameters of our synth from the PluginEditor, we create a series of public methods in PluginProcessor to control each parameter of our synth. In PluginProcessor.h this will look like:
public:
  void setFreq(float freq);
  void setGain(float gain);
  void setCutoff(float cutoff);
  void setGate(bool gate);
and the corresponding implementation in PluginProcessor.cpp will be:
void SawtoothSynthAudioProcessor::setFreq(float freq)
{
  dspFaust.setParamValue("/synth/freq",freq);
}

void SawtoothSynthAudioProcessor::setGain(float gain)
{
  dspFaust.setParamValue("/synth/gain",gain);
}

void SawtoothSynthAudioProcessor::setGate(bool gate)
{
  if(gate){
    dspFaust.setParamValue("/synth/gate",1);
  }
  else{
    dspFaust.setParamValue("/synth/gate",0);
  }
}

void SawtoothSynthAudioProcessor::setCutoff(float cutoff)
{
  dspFaust.setParamValue("/synth/cutoff",cutoff);
}
Hence, setParamValue has 2 arguments: the path of the parameter in the Faust code, and its value. Note that a list of all the available parameters of the Faust object of their corresponding path can be found in the markdown documentation of the package generated with faust2api.
That’s it for the PluginProcessor! Easy isn’t it ;)? Now, let’s add a basic interface to control this synth.
We add a series of sliders, button, and labels to the private section of SawtoothSynthAudioProcessorEditor in PluginEditor.h:
private:
  Slider frequencySlider;
  Slider gainSlider;
  Slider cutoffSlider;
  ToggleButton onOffButton;

  Label frequencyLabel;
  Label gainLabel;
  Label cutoffLabel;
  Label onOffLabel;
and their corresponding implementation in PluginEditor.cpp:
SawtoothSynthAudioProcessorEditor::SawtoothSynthAudioProcessorEditor (SawtoothSynthAudioProcessor& p)
    : AudioProcessorEditor (&p), processor (p)
{
  setSize (800, 130);

  addAndMakeVisible (frequencySlider);
  frequencySlider.setRange (50.0, 5000.0);
  frequencySlider.setSkewFactorFromMidPoint (500.0);
  frequencySlider.setValue(300);
  frequencySlider.onValueChange = [this] {
    processor.setFreq(frequencySlider.getValue());
  };

  addAndMakeVisible(frequencyLabel);
  frequencyLabel.setText ("Frequency", dontSendNotification);
  frequencyLabel.attachToComponent (&frequencySlider, true);

  addAndMakeVisible (gainSlider);
  gainSlider.setRange (0.0, 1.0);
  gainSlider.setValue(0.5);
  gainSlider.onValueChange = [this] {
    processor.setGain(gainSlider.getValue());
  };

  addAndMakeVisible(gainLabel);
  gainLabel.setText ("Gain", dontSendNotification);
  gainLabel.attachToComponent (&gainSlider, true);

  addAndMakeVisible (cutoffSlider);
  cutoffSlider.setRange (50.0, 10000.0);
  cutoffSlider.setValue(5000.0);
  cutoffSlider.onValueChange = [this] {
    processor.setCutoff(cutoffSlider.getValue());
  };

  addAndMakeVisible(cutoffLabel);
  cutoffLabel.setText ("Cutoff", dontSendNotification);
  cutoffLabel.attachToComponent (&cutoffSlider, true);

  addAndMakeVisible(onOffButton);
  onOffButton.onClick = [this] {
    processor.setGate(onOffButton.getToggleState());
  };

  addAndMakeVisible(onOffLabel);
  onOffLabel.setText ("On/Off", dontSendNotification);
  onOffLabel.attachToComponent (&onOffButton, true);
}
The methods that we declared in the previous step are basically called to set the value of the parameters of our DSP engine thanks to the processor object.
The resized method must be implemented so that the various UI elements that we created actually have a size:
void SawtoothSynthAudioProcessorEditor::resized()
{
  const int sliderLeft = 80;
  frequencySlider.setBounds (sliderLeft, 10, getWidth() - sliderLeft - 20, 20);
  gainSlider.setBounds (sliderLeft, 40, getWidth() - sliderLeft - 20, 20);
  cutoffSlider.setBounds (sliderLeft, 70, getWidth() - sliderLeft - 20, 20);
  onOffButton.setBounds (sliderLeft, 100, getWidth() - sliderLeft - 20, 20);
}
Finally, make sure that you clean the implementation of the paint method to get rid of the default ugly “Hello World”:
void SawtoothSynthAudioProcessorEditor::paint (Graphics& g)
{
  g.fillAll (getLookAndFeel().findColour (ResizableWindow::backgroundColourId));
}
Note that the same approach can be used to create an audio effect: DspFaust will take care of instantiating the input buffers, etc. so it should just work right away as for this synth example.
Compile your plug-in and run it, it should look like this:

The goal of this section was just to show you how to integrate a Faust DSP engine into a JUCE plug-in project and how to control it with a simple UI. Once again, JUCE is a powerful tool to implement sophisticated UI in a very simple way. You’ll find all the documentation you need on their website to start making beautiful plug-ins!
Creating and Using a Polyphonic Faust DSP Object
<< Download the source of this tutorial >>
In the second part of this tutorial, we demonstrate how to generate a polyphonic DSP engine with faust2api and how to control it with the “standard” JUCE keyboard.
The following code is almost the same as the one used in the previous section, except that we declared a global effect using the effect standard variable (filteredSawtoothPoly.dsp):

import("stdfaust.lib");
freq = nentry("freq",500,200,1000,0.01) : si.smoo;
gain = nentry("gain",0.5,0,1,0.01) : si.smoo;
gate = button("gate") : si.smoo;
cutoff = nentry("cutoff",10000,50,10000,0.01) : si.smoo;
process = os.sawtooth(freq)*gain*gate : fi.lowpass(3,cutoff) <: _,_ ;
effect = dm.zita_light;Note that the freq, gain, and gate parameters are declared, which means that this Faust program can be turned into a polyphonic synth (see the MIDI polyphonic documentation). Hence, in the current configuration multiple instances (voices) of process will be created and connected to a single instance of effect.
A polyphonic DSP engine for JUCE can be generated from this code by running:
faust2api -juce -nvoices 12 filteredSawtoothPoly.dspwhere 12 is the maximum number of polyphonic voices (which can be changed from the generated C++ code as well by changing the value of the NVOICES macro at the beginning of DspFaust.cpp). The same result can be achieved using the Faust web editor and by choosing source/juce-poly in the export function.
Create a new JUCE audio plug-in project with the same configuration than in the previous section. Import the DspFaust files, create an instance of the DspFaust object and call the dspFaust.start() and dspFaust.stop() methods as we did before.
Our goal is to create a simple plug-in with the following interface:
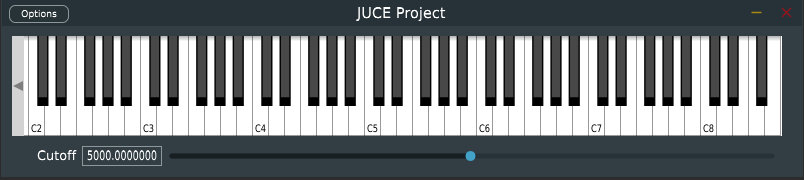
where the keyboard can be used to play several notes at the same time and the “cutoff” slider can be used to change the cutoff frequency of the lowpass filter of all active voices. This is an extremely primitive implementation where only the messages from the UI keyboard are processed: we’re just doing this for the sake of the example. If you’ve never worked with keyboards and MIDI in JUCE, we strongly recommend you to read this tutorial.
In PluginEditor.h, let’s first add the following inheritance to the SawtoothSynthAudioProcessorEditor class:
class SawtoothSynthAudioProcessorEditor  :
  public AudioProcessorEditor,
  private MidiInputCallback,
  private MidiKeyboardStateListener
{
This is necessary to implement the MIDI callback and the keyboard (UI) listener. This inheritance requires us to implement the following methods in the private section of PluginEditor.h. We also add an instance of a UI keyboard and its associated state as well as a slider and its label to control the cutoff frequency of the lowpass:
private:
  void handleNoteOn (MidiKeyboardState*, int midiChannel, int midiNoteNumber, float velocity) override;
  void handleNoteOff (MidiKeyboardState*, int midiChannel, int midiNoteNumber, float /*velocity*/) override;
  void handleIncomingMidiMessage (MidiInput* source, const MidiMessage& message) override;

  MidiKeyboardState keyboardState;
  MidiKeyboardComponent keyboardComponent;

  Slider cutoffSlider;
  Label cutoffLabel;
In PluginEditor.cpp, we can add the keyboard and the slider to the constructor:
SawtoothSynthAudioProcessorEditor::SawtoothSynthAudioProcessorEditor (SawtoothSynthAudioProcessor& p)
  : AudioProcessorEditor (&p), processor (p), keyboardComponent (keyboardState, MidiKeyboardComponent::horizontalKeyboard)
{
  setSize (800, 150);

  addAndMakeVisible (keyboardComponent);
  keyboardState.addListener (this);

  addAndMakeVisible (cutoffSlider);
  cutoffSlider.setRange (50.0, 10000.0);
  cutoffSlider.setValue(5000.0);
  cutoffSlider.onValueChange = [this] {
    processor.setCutoff(cutoffSlider.getValue());
  };

  addAndMakeVisible(cutoffLabel);
  cutoffLabel.setText ("Cutoff", dontSendNotification);
  cutoffLabel.attachToComponent (&cutoffSlider, true);
}
and we must de-allocate the keyboard state listener in the destructor:
SawtoothSynthAudioProcessorEditor::~SawtoothSynthAudioProcessorEditor()
{
  keyboardState.removeListener(this);
}
The implementation of the setCutoff method is detailed later in this tutorial and is very similar to the one described in the previous section.
We also need to define the size of the various elements in the interface (as we did before):
void SawtoothSynthAudioProcessorEditor::resized()
{
  const int sliderLeft = 80;
  keyboardComponent.setBounds (10,10,getWidth()-30,100);
  cutoffSlider.setBounds (sliderLeft, 120, getWidth() - sliderLeft - 20, 20);
}
MIDI messages are retrieved from the keyboard simply by implementing the following inherited methods:
void SawtoothSynthAudioProcessorEditor::handleIncomingMidiMessage (MidiInput* source, const MidiMessage& message) {}

void SawtoothSynthAudioProcessorEditor::handleNoteOn (MidiKeyboardState*, int midiChannel, int midiNoteNumber, float velocity)
{
  processor.keyOn(midiNoteNumber,int(127*velocity));
}

void SawtoothSynthAudioProcessorEditor::handleNoteOff (MidiKeyboardState*, int midiChannel, int midiNoteNumber, float /*velocity*/)
{
  processor.keyOff(midiNoteNumber);
}
The implementation of the keyOn and keyOff methods is detailed below.
On the PluginProcessor side, the following methods must be declared in PluginProcessor.h:
void keyOn(int pitch, int  velocity);
void keyOff(int pitch);
void setCutoff(float cutoff);
They are the ones that were used in the previous steps.
Their corresponding implementation in PluginProcessor.cpp is very straight forward:
void SawtoothSynthAudioProcessor::keyOn(int pitch, int velocity)
{
  dspFaust.keyOn(pitch,velocity);
}

void SawtoothSynthAudioProcessor::keyOff(int pitch)
{
  dspFaust.keyOff(pitch);
}

void SawtoothSynthAudioProcessor::setCutoff(float cutoff)
{
  dspFaust.setParamValue("/Sequencer/DSP1/Polyphonic/Voices/synth/cutoff",cutoff);
}
keyOn and keyOff are methods from DspFaust that can be used to trigger and stop a note. keyOn will allocate a new voice, convert its pitch parameter into a frequency that will be sent automatically to the Faust freq parameter, velocity is converted to a level that will be sent to the gain parameter, and the gate parameter is set to 1. Inversely, keyOff sets gate to 0 and waits for t60 to be reached to de-allocate the current voice.
keyOn returns a voice ID whose type is unsigned long. This ID can then be used to change the parameter of a specific voice. We’re not using this functionality in the example presented in this tutorial but here is how this would work:
unsigned long voiceID = dspFaust.keyOn(60,110);
dspFaust.setVoiceParamValue("/synth/cutoff",voiceID,378);
Note that voices can also be allocated directly without using keyOn and keyOff with the newVoice and the deleteVoice methods:
unsigned long voiceID = dspFaust.newVoice();
dspFaust.setVoiceParamValue("/synth/gate",voiceID,1);
// do something...
dspFaust.deleteVoice(voiceID);
Using setParamValue as we’re doing in the current example, we can set the value of a parameter for all the voices of the DSP engine. Unlike setVoiceParamValue, the parameter path must be the complete path provided in the README of the DSP package generated with faust2api. So once again, for setVoiceParamValue, the short path is enough but for setParamValue, the complete path is needed.
You might wonder why the path is much more complex with a polyphonic DSP engine than with a regular one. Sequencer is the full object (poly synth + effect), DSP1 is the synth (DSP2 is the effect), Polyphonic is the polyphonic layer of the object, and finally Voices addresses all the voices at once.
That’s it folks! Try to compile and run your plug-in, it should just work. Of course, things could be significantly improved here but at this point, you should be able to sail on your own.
DSP on the Teensy With Faust
Introduction
The Teensy is a development board series based on a microcontroller and distributed by PJRC. The Teensys 3.(2+) are based on an ARM Cortex-M4 providing plenty of computational power for real-time audio signal processing applications. In particular, the Cortex-M4 used on the Teensy 3.6 (MK66FX1M0VMD18) hosts a Floating Point Unit (FPU) and has a clock of 180MHz (overclockable at 240MHz). Also, PJRC recently released the Teensy 4.0 which is based on a Cortex-M7 (FPU) with a clock of 600MHz and much more memory than the 3.6. When combined with their respective audio shields (also distributed by PJRC), the Teensy 3.6/4.0 can be used to synthesize and process sound with advanced algorithms, etc. This paper provides a survey on the performances of such system when used with Faust-generated DSP objects.
Using this type of chip for embedded real-time audio DSP presents a wide range of advantages:
- low power consumption (i.e., can be easily powered by a battery),
- bare-metal: the lack of operating system allows for the use of very low block sizes (i.e., as low as 8 samples on the Teensy) and therefore extremely low latency,
- very short boot time (<1s),
- etc.
The Teensy/Teensyduino comes with an Audio Library that can be used to synthesize sound directly on the Teensy. It uses a patching paradigm where DSP objects can be connected together using virtual patch chords. An online tool provides a user interface to this system and allows for the implementation of sound processing algorithms in a “Max/MSP way.” Various elements can be used as the input and the output of the system (e.g., built-in Teensy DAC/ADC, audio shield, etc.). More information and tutorials can be found on the Audio Library webpage.
The current DSP objects of the Teensy Audio Library can be used to implement simple algorithms but their scope is relatively limited (i.e., basic oscillators, filters, etc.). faust2teensy can be used to implement new objects for the Teensy Audio Library using Faust. Since Faust is currently not able to produce fixed-point DSP C++ code, generated object use floating point arithmetic internally. The main consequence is that this system will only work efficiently if it’s used on a Teensy board hosting an FPU. Hence, we strongly recommend you to use the Teensy 3.6/4.0 for this (things will work on the 3.2, but computational power will be extremely limited).
This tutorial walks you through the steps of synthesizing sound with Faust on the Teensy.
Band-Limited Sawtooth Oscillator on the Teensy
The source code of the section can be downloaded here
The Teensy Audio Library doesn’t come with any band-limited sawtooth wave oscillator (which are crucial to the implementation of good quality virtual analog synthesizer). The Faust libraries come with a wide range of band-limited oscillators that can be easily ported to the Teensy.
The following program (FaustSawtooth.dsp) implements a sawtooth wave oscillator with controllable gain and frequency:

import("stdfaust.lib");
freq = nentry("freq",440,20,20000,0.01) : si.smoo;
gain = nentry("gain",1,0,1,0.01) : si.smoo;
process = os.sawtooth(freq)*gain;si.smoo is used to interpolate the values of the freq and gain parameters to prevent clicks and abrupt changes.
This Faust program can be turned into an object for the Teensy Audio Library simply by running the following command in a terminal:
faust2teensy -lib FaustSawtooth.dspwhich will generate a zip file containing a .cpp and a .h file in return. Alternatively, the Faust online compilation service can be used through the Faust Online Editor to carry out this task (Export(Truck)/source/teensy). The generated package should contain a file called FaustSawtooth.cpp and FaustSawtooth.h.
Create a new project in the Arduino/Teensyduino software (e.g., call it faustSawtooth) and place FaustSawtooth.cpp and FaustSawtooth.h in the same folder (whose name should probably be /faustSawtooth) than faustSawtooth.ino.
Replace the content of the Arduino program with the following:
#include <Audio.h>
#include "FaustSawtooth.h"

FaustSawtooth faustSawtooth;
AudioOutputI2S out;
AudioControlSGTL5000 audioShield;
AudioConnection patchCord0(faustSawtooth,0,out,0);
AudioConnection patchCord1(faustSawtooth,0,out,1);

void setup() {
  AudioMemory(2);
  audioShield.enable();
  audioShield.volume(0.1);
}

void loop() {
  faustSawtooth.setParamValue("freq",random(50,1000));
  delay(50);
}
First, the header file (.h) of the object generated with faust2teensy is included. An instance of FaustSawtooth is then created. Since the Teensy (3.6/4.0) that we’re using for this tutorial is equipped with a Teensy Audio Shied, we also create an instance of AudioOutputI2S and AudioControlSGTL5000. We then connect the Faust object to the 2 outputs of the audio shield using AudioConnections. Note that if the Faust object had a stereo output (i.e., process = os.sawtooth(freq)*gain <: _,_), the following should have been written instead:
AudioConnection patchCord0(faustSawtooth,0,out,0);
AudioConnection patchCord1(faustSawtooth,1,out,1);
The number of inputs and outputs of objects generated with faust2teensy corresponds to the number inputs and outputs of the Faust program.
2 bytes of memory are allocated in setup(). Note that if the Faust object had audio inputs, this number should probably be greater (i.e., typically 6 for stereo in and stereo out).
audioShield.enable() activates the audio shield and audioShield.volume(0.1) sets the gain of the headphone output (this step is optional).
The value of the freq and gain parameters can be set using the setParamValue method. Note that for larger Faust objects, parameter paths might be used instead. Here, the value of freq is randomly generated every 50ms.
After making these changes, you should be able to compile and upload your sketch to the Teensy 4.0.
Special Note About the Teensy 3.6
Before this program can be compiled and uploaded to the Teensy 3.6, some modifications need to be made to the configuration file used by the compilation script used by Teensyduino (boards.txt). You should be able to find it in hardware/teensy/avr in the source of the Arduino software (its location will vary depending on the platform your using). The most important thing to do here is to use g++ instead of gcc for linking, so:
teensy36.build.command.linker=arm-none-eabi-gccshould become:
teensy36.build.command.linker=arm-none-eabi-g++in boards.txt. Beware that on older versions of Teensyduino, these changes should be made directly to platform.txt.
After making these changes, you should be able to compile and upload your sketch to the Teensy 3.6.
Audio Effect
The source code of the section can be downloaded here
The same procedure as the one described in the previous section can be followed to generate audio effects for the Teensy Audio Library. dm.zita_light implements a high quality stereo feedback delay network reverb. It hosts its own user interface elements/parameters to control its dry/wet mix (Dry/Wet Mix) and its level in dB (Level).
A simple Faust program (FaustZita.dsp) calling this effect could look like that:

The corresponding Teensy Audio Library object can be generated by running:
faust2teensy -lib FaustZita.dspand finally called in a Teensy program:
#include <Audio.h>
#include "FaustZita.h"

FaustZita faustZita;
AudioInputI2S in;
AudioOutputI2S out;
AudioControlSGTL5000 audioShield;
AudioConnection patchCord0(in,0,faustZita,0);
AudioConnection patchCord1(in,1,faustZita,1);
AudioConnection patchCord2(faustZita,0,out,0);
AudioConnection patchCord3(faustZita,1,out,1);

void setup() {
  AudioMemory(6);
  audioShield.enable();
  faustZita.setParamValue("level",0);
}

void loop() {
  float dw = analogRead(A0)/512 - 1;
  faustZita.setParamValue("dryWet",dw);
  delay(10);
}
Note that in this example, a potentiometer connected to the Analog Input 0 of the Teensy is used to control the dry/wet mix of the reverb.
Additional Configuration for Low Audio Latency
Thanks to its bare-metal architecture, the Teensy allows for extremely low audio latency which would be more or less impossible to achieve if an operating system was used. Audio latency is mostly determined by the block size of the system. The default block size of the Teensy Audio Library is 128 samples but it can be cranked down to 8 samples (only if Faust DSP objects are used exclusively) without impacting performances too much (see the corresponding SMC paper). Block size is set by a C++ macro (AUDIO_BLOCK_SAMPLES) that can be overridden before compilation by passing it as an argument to the C++ compiler by substituting the following line in boards.txt (see previous section):
teensy36.build.flags.defs=-D__MK66FX1M0__ -DTEENSYDUINO=146with:
teensy36.build.flags.defs=-D__MK66FX1M0__ -DTEENSYDUINO=146 -DAUDIO_BLOCK_SAMPLES=8on the Teensy 3.6, and:
teensy40.build.flags.defs=-D__MK66FX1M0__ -DTEENSYDUINO=146with:
teensy40.build.flags.defs=-D__MK66FX1M0__ -DTEENSYDUINO=146 -DAUDIO_BLOCK_SAMPLES=8on the Teensy 4.0.
Similarly, the sampling rate (44100KHz by default) can be set using the AUDIO_SAMPLE_RATE_EXACT macro. Note that computing the “exact” sampling rate compatible with the clock of your Teensy might be a bit tricky. For example, AUDIO_SAMPLE_RATE_EXACT is 44117.64706 by default and not 44100, etc.
Warning!!!
In the latest version of the Teensy Audio Library, a “weird” correction to the code of the built-in freeverb function has been made an will prevent you from using a block size of 8 samples. Here’s a fix to this problem that should be made in the installed version of effect_freeverb.cpp:
0, 0, 0, {
0, 0, 0, 0, 0, 0, 0, 0,
#if AUDIO_BLOCK_SAMPLES > 8
0, 0, 0, 0, 0, 0, 0, 0,
#endif
#if AUDIO_BLOCK_SAMPLES > 16
0, 0, 0, 0, 0, 0, 0, 0, 0, 0, 0, 0, 0, 0, 0, 0,
#endif
Notes About Computational Power and Memory Footprint
While the Teensy 3.6 is relatively powerful and can be used to run complex DSP algorithm (up to 90 Faust sine waves in parallel), it doesn’t have a lot of RAM. For that reason, algorithms with a large memory footprint (e.g., anything using delay a lot such a reverbs, wave table oscillators, etc.) might have to be adapted to be run on the Teensy. For example, the default Faust sine wave oscillator uses a table of 65536 samples which is to big to be loaded in the Teensy RAM. Hence, its definition should be adapted, e.g.:
osc(freq) = rdtable(tablesize, os.sinwaveform(tablesize), int(os.phasor(tablesize,freq)))
with{
    tablesize = 1 << 15; // instead of 1 << 16
};
Similarly, the maximum size of the delay lines of some reverb algorithms might be too big and should be adjusted, etc.
DSP on the ESP32 With Faust
The ESP32 is a cheap microcontroller providing built-in Bluetooth and Wifi support, many GPIOs and analog inputs, etc. It’s extremely low price (a few dollars) makes it very attractive and it is being used in an increasing number of boards. A wide range of “unknown/secret” development boards targeting audio applications are based on the ESP32 and can be found on Alibaba/AliExpress. While most of them target the development of “intelligent speakers” (e.g., Alexa, etc.), they host all the components to carry out real-time DSP applications and can therefore be used to develop digital musical instruments, effect processors, synthesizer hardware, etc. The TTGO T-Audio or the ESP32 Audio Dev Kit are good examples of such boards.
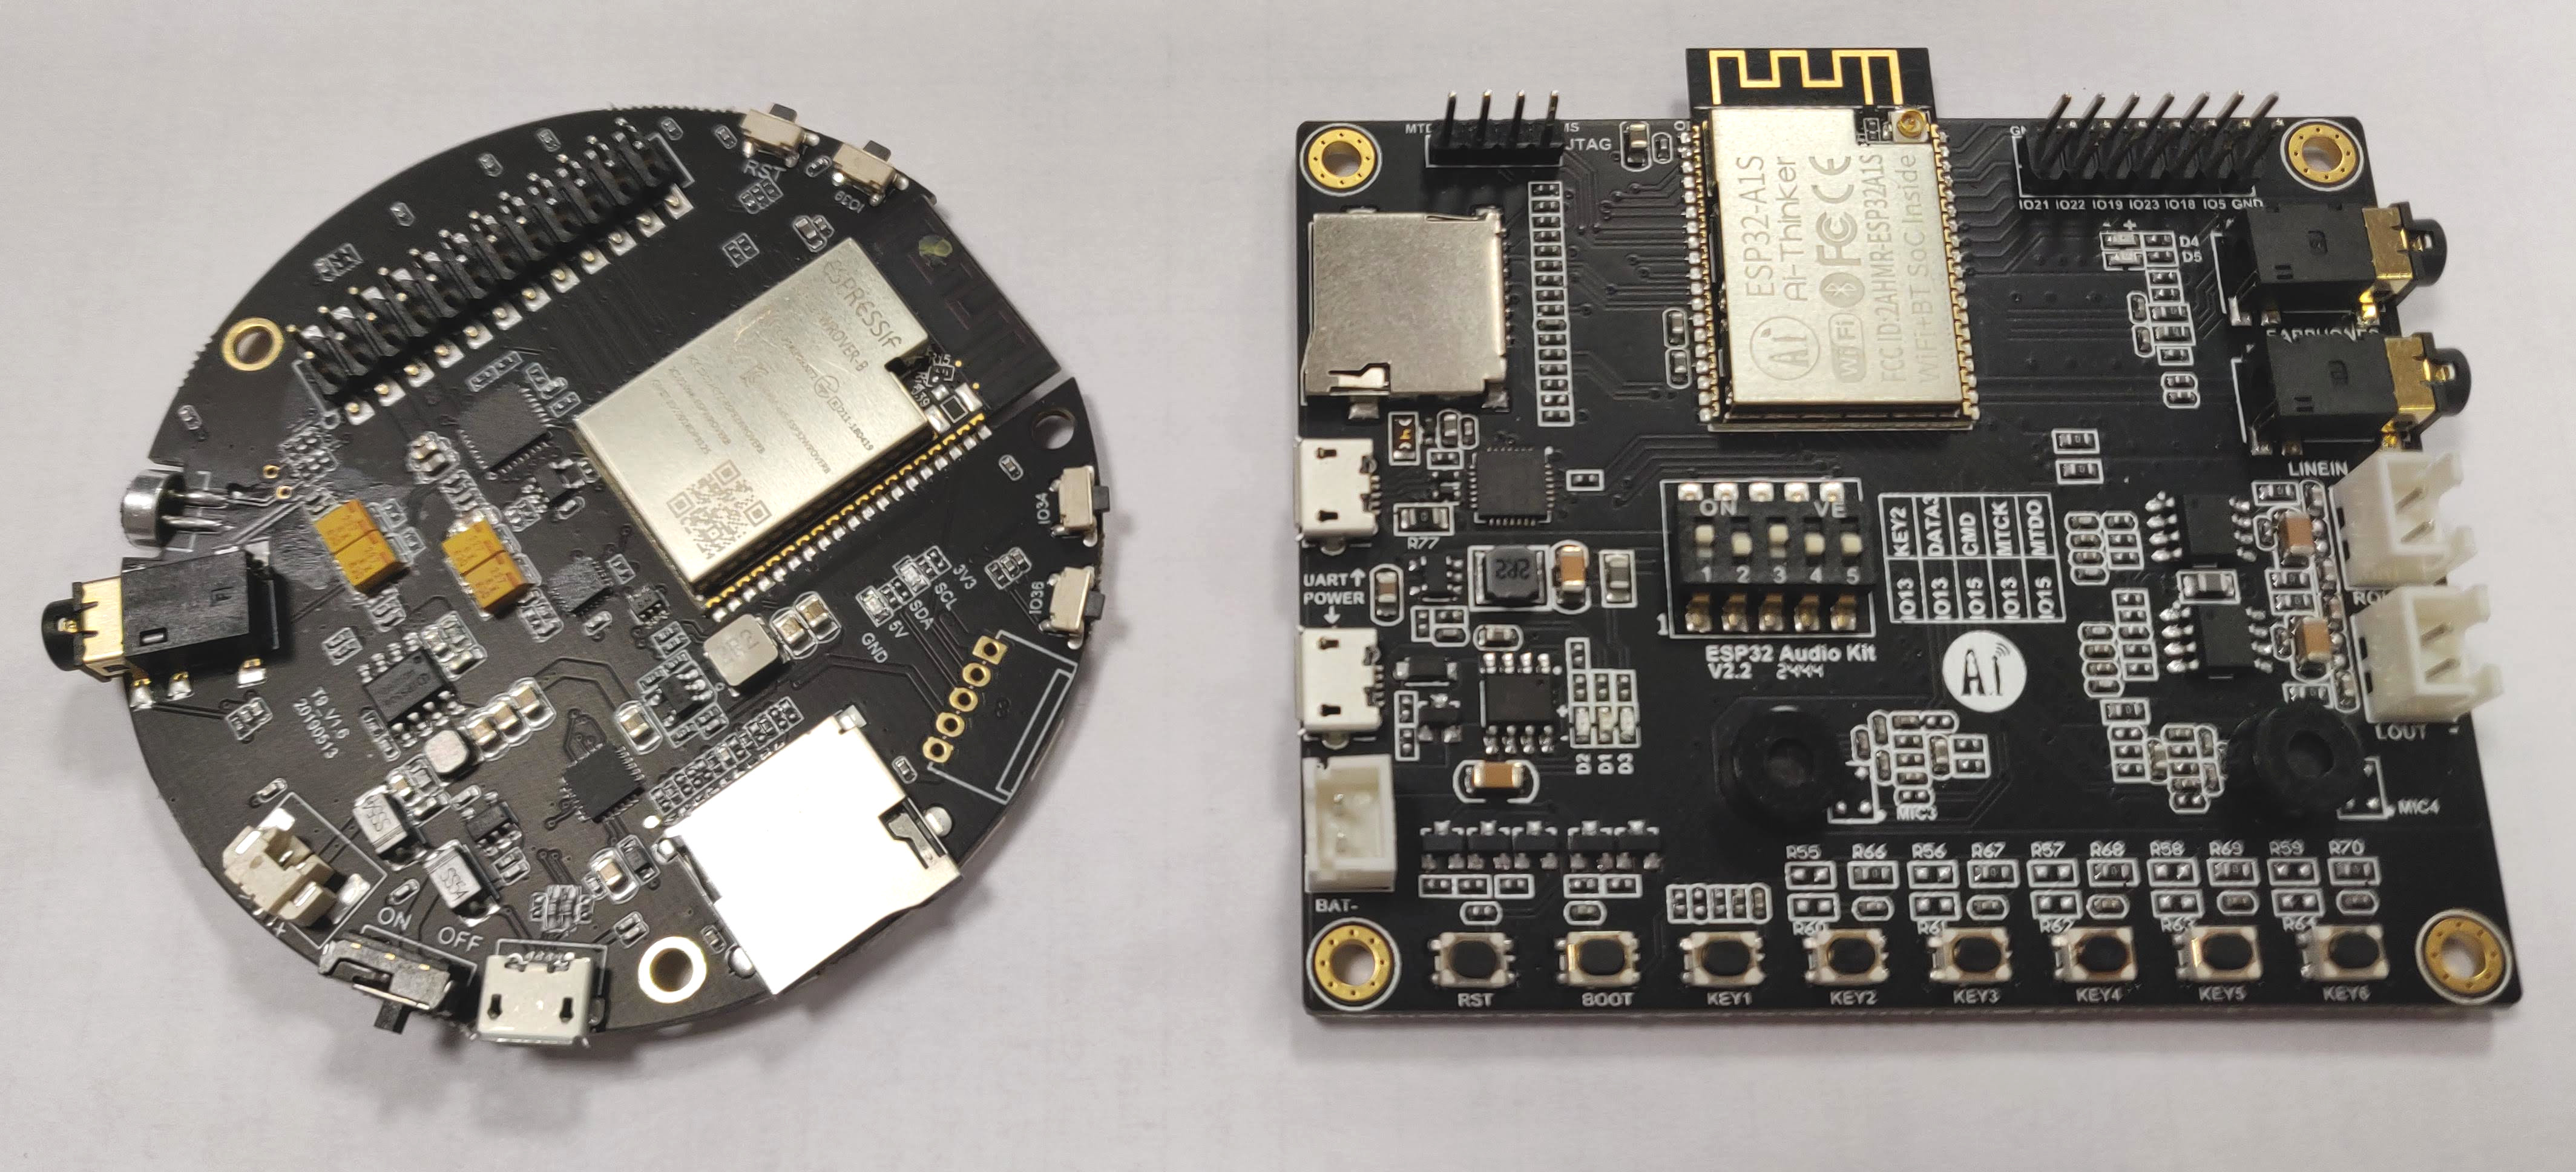
They both host relatively good quality audio codecs with stereo in and out and built-in amplifier, battery circuit, external RAM, and various motion sensors (only for the TTGO T-Audio), all that for less than $15!! Since these boards don’t run any OS, very low audio latency can be achieved (i.e., buffer size of 8 samples, etc.). Compared to the Teensy 3.6/4.0 and their respective audio shields, these boards are MUCH cheaper, they’re more powerful than the Teensy 3.6 (dual core with a much higher clock) and most importantly, they have enough RAM to run DSP algorithms with a large memory footprint such as reverbs, echos, etc. (which is relatively limited on the Teensy 3.6 and 4.0). Finally, the ESP32 ecosystem is entirely open source (including its loader)! In many ways, they can compete with much more expensive dedicated audio platforms such as the BELA (<$150), etc.
The Faust distribution now comes with faust2esp32, a tool to program ESP32-based boards with Faust. faust2esp32 is still under development and its current version allows to generate DSP engines that can be used in ESP32 projects to carry out sound synthesis and processing tasks. While the mechanism (i2s) used to communicate between the ESP32 and the audio codec is the same on all boards, the brand and the type of audio codecs used on ESP32-based boards varies quite a lot. faust2esp32 supports a few audio codecs which can be listed by running faust2esp32 -h or by looking at the faust2esp32 doc.
DSP engines produced by faust2esp32 are compatible with both the C++ and the Arduino development environment of the ESP32. The two following sections walk you through starting a new ESP32 project and adding Faust audio support to it using both methods.
Using the ESP32 C++ Development Environment
The final source code of this tutorial can be found here.
Programming the ESP32 with its native C++ environment offers many advantages. In particular, it allows for a very fine tuning of the board configuration and compilation options. For example, if your DSP algorithm will have a large memory footprint, you might have no other option since external RAM will have to be activated (see Using the External RAM of the ESP32 section).
In this short tutorial, we walk you through the steps of making a C++ project from scratch with audio DSP support for the TTGO T-Audio board (the procedure should be more or less the same for similar types of boards).
Starting a New ESP32 Project
Information on how to configure your ESP32 C++ development environment can be found in this tutorial (read it until the end of step 4).
Once your environment is up and running, copy the ESP32 hello_world example project somewhere on your system. Then run make, which should automatically prompt the ESP32 configuration panel. Make some modifications if needed (i.e., serial flasher config as specified in the ESP32 get started tutorial, etc.). Once you exit the menu, compilation should start and complete without any issue.
Since the DSP engine that we’re about to generate with faust2esp32 uses C++, the main file of the current project should be modified to use C++ as well. To do so, just rename main/hello_world_main.c to main/main.cpp (or any other name you’d like, of course, as long as you use the cpp extension). Then, make sure the basic structure of your program looks like this:
#include <stdio.h>
#include "freertos/FreeRTOS.h"
#include "freertos/task.h"
#include "esp_system.h"
#include "esp_spi_flash.h"

extern "C" {
    void app_main(void);
}

void app_main(void)
{
  while(1) {
    vTaskDelay(1000 / portTICK_PERIOD_MS);
  }
}
Here, the infinite while loop gets ran in the main thread/task and is updated every second. Update the CMakeLists.txt file at the root of the project to change the project name (e.g., project(FaustTutorial)). Similarly, update the CMakeLists.txt file in main to set the right file for the component source (e.g., set(COMPONENT_SRCS "main.cpp")). Run make again to be sure that your program still compiles and that you didn’t break anything.
Making a Simple DSP Engine
Let’s now write a simple Faust program (the usual one haha) implementing a band limited sawtooth wave with smoothed control:
import("stdfaust.lib");

freq = nentry("freq",440,20,20000,0.01) : si.smoo;
gain = nentry("gain",1,0,1,0.01) : si.smoo;

process = os.sawtooth(freq)*gain;
Save it in a file called FaustSawtooth.dsp (this will define the name of the corresponding DSP engine) and compile it using faust2esp32 by running the following command:
faust2esp32 -lib FaustSawtooth.dsp-lib asks to generate a C++ DSP engine here as opposed to a complete firmware.
Note: the current version of
faust2esp32only allows to generate DSP engines (not complete ESP32 programs) so the-liboption is not really necessary here.
Alternatively, this could be done by selecting the ESP32 target in the Faust compilation service in the online editor.
In both cases, a .zip package containing a set of C++ files will be returned. In the current example, FaustSawtooth.[cpp/h] implement the Faust DSP object produced from FaustSawtooth.dsp and WM8978.[cpp/h] is the object corresponding to the audio codec of your board.
Note: in the current version of
faust2esp32, the only supported audio codecs are the WM8978 (-WM8978option) which is that of the TTGO T-Audio board and the AC101 (-AC101option).
All these files should be placed in the main folder of the project. After that, they should be included to main.cpp as follows:
#include <stdio.h>
#include "freertos/FreeRTOS.h"
#include "freertos/task.h"
#include "esp_system.h"
#include "esp_spi_flash.h"

#include "WM8978.h"
#include "FaustSawtooth.h"

extern "C" {
    void app_main(void);
}
Configuring the Audio Codec
Next, the WM8978 object (which corresponds to the audio codec, i.e., audio interface on the board) should be instantiated and configured in app_main:
WM8978 wm8978;
wm8978.init();
wm8978.addaCfg(1,1);
wm8978.inputCfg(1,0,0);
wm8978.outputCfg(1,0);
wm8978.micGain(30);
wm8978.auxGain(0);
wm8978.lineinGain(0);
wm8978.spkVolSet(0);
wm8978.hpVolSet(40,40);
wm8978.i2sCfg(2,0);
Once again, the current version of faust2esp32 only provides support for the Wolfson WM8978 present on the TTGO T-Audio and the AC101, but we’re working at adding new codecs from other manufacturers, etc. The procedure should be similar with other codecs.
The present configuration activates the mic input, deactivates the amp for the speaker, sets the headphone gain to 40, etc. Please refer to the WM8978 object documentation for more information.
Note that each of these commands will be called “in real-time” at start-up so the configuration of the audio codec is progressively done and should be carried out before sending any audio buffer to it.
Instantiating the Faust DSP Engine
After configuring the audio codec, the Faust DSP object produced in the previous step and included in main.cpp should be instantiated in app_main as well:
int SR = 48000;
int BS = 8;
FaustSawtooth faustSawtooth(SR,BS);
faustSawtooth.start();
The constructor of FaustSawtooth takes two arguments: the sampling rate (48kHz here) and the block size (8 here). Calling the constructor will configure the object, allocate memory for it, etc. but in order to start computation, the start() method needs to be called. Since ESP32 firmwares are based on freertos, audio is computed in its own high priority task and calling start() will launch this task. Note that this task can be removed and audio computation stopped at any time simply by calling stop().
Finally, the setParamValue method of the FaustSawtooth object can be called at any point to change the value of one of the parameter of the Faust object (here, two parameters were declared: freq and gain). For example, the frequency of the generated sawtooth could be randomly changed at every sample by calling the following line in the while loop at the bottom of app_main:
faustSawtooth.setParamValue("freq",rand()%(2000-50 + 1) + 50);At this point, main.cpp should look like this:
#include <stdio.h>
#include "freertos/FreeRTOS.h"
#include "freertos/task.h"
#include "esp_system.h"
#include "esp_spi_flash.h"

#include "WM8978.h"
#include "FaustSawtooth.h"

extern "C" {
    void app_main(void);
}

void app_main(void)
{
    WM8978 wm8978;
    wm8978.init();
    wm8978.addaCfg(1,1);
    wm8978.inputCfg(1,0,0);
    wm8978.outputCfg(1,0);
    wm8978.micGain(30);
    wm8978.auxGain(0);
    wm8978.lineinGain(0);
    wm8978.spkVolSet(0);
    wm8978.hpVolSet(40,40);
    wm8978.i2sCfg(2,0);

    int SR = 48000;
    int BS = 8;
    FaustSawtooth faustSawtooth(SR,BS);
    faustSawtooth.start();

    while(1) {
        faustSawtooth.setParamValue("freq",rand()%(2000-50 + 1) + 50);
        vTaskDelay(1000 / portTICK_PERIOD_MS);
    }
}
Try to recompile the firmware and upload it to your board. If headphones are connected to it, you should hear a sawtooth wave whose frequency changes randomly every second.
Using the External RAM of the ESP32
Some DSP algorithms might require a large amount of memory allocation (e.g., wave tables, delays, etc.). In that case, the object generated by Faust might not fit in the built-in RAM of the ESP32 and it might be necessary to use the external RAM module (SRAM) of the board.
In order to test this, we first need to write a Faust program that will need a large amount of memory. Replacing the sawtooth wave of the previous example by a sine wave should do it since the default sine wave oscillator of Faust (os.osc) is based on a wave table of size 65536:
import("stdfaust.lib");

freq = nentry("freq",440,20,20000,0.01) : si.smoo;
gain = nentry("gain",1,0,1,0.01) : si.smoo;

process = os.osc(freq)*gain;
You can then follow the same steps as the ones described in the Making a Simple DSP Engine section to integrate this Faust program to your C++ ESP32 project.
If you try to compile your firmware again (i.e., make), you should get the following error during linking :
[...]/xtensa-esp32-elf/bin/ld: hello-world.elf section `.dram0.bss' will not fit in region `dram0_0_seg'
[...]/xtensa-esp32-elf/bin/ld: DRAM segment data does not fit.
[...]/xtensa-esp32-elf/bin/ld: region `dram0_0_seg' overflowed by 93408 bytes
collect2: error: ld returned 1 exit status
To solve this problem, the external RAM can be integrated to the memory map of the ESP32. To do so, run make menuconfig and navigate to Component Config/ESP32-specific. Then activate Support for external RAM, SPI-Connected RAM by highlighting this zone and pressing the y key. Enter the SPI RAM config/SPI RAM access method menu and choose Integrate RAM into ESP32 memory map. Then select Allow .bss segment placed in external memory and press the y key to activate this function. Finally, open FaustSawtooth.cpp (even though we’re trying to synthesize a sine wave now, i.e., the name of this file might differ in your case) and search for static float ftbl0mydspSIG0 which is the static table that will be filled with the sine wave table. This section of the C++ code generated by the Faust compiler will always contain large tables requiring lots of memory. You now want to add the EXT_RAM_ATTR attribute next to the table definition:
static float ftbl0mydspSIG0[65536] EXT_RAM_ATTR;It indicates the C++ compiler that this static table should be placed in the external memory rather than in the built-in one. In case your Faust program is doing something else than synthesizing a sine wave, you might have to put this attribute in each table definition.
Note: We’re currently modifying the Faust compiler to automatize this process when a specific option is given to it.
Finally, try to recompile your firmware and it should all work nicely now!
Using the Arduino Development Environment
The final source code of this tutorial can be found here.
The Arduino development environment can also be used to program the ESP32. The steps to use a Faust-generated DSP engine in that context are quite similar to that of the C++ environment described in the previous section.
First, make sure that the esp32 package is installed in the Arduino Boards Manager (Tools/Board/Boards Manager). Next, create a new empty project and save it. You can then follow the same steps as the one described in the Making a Simple DSP Engine section of the previous tutorial, however you should place the FaustSawtooth.[cpp/h] and WM8978.[cpp/h] files in the same folder as the one containing the .ino file of your project. Hence, the tree of your project folder should now look like this:
esp32Tuto.ino
FaustSawtooth.cpp
FaustSawtooth.h
WM8978.cpp
WM8978.h
You can then edit your Arduino program as follows:
#include "freertos/FreeRTOS.h"
#include "freertos/task.h"

#include "WM8978.h"
#include "FaustSawtooth.h"

FaustSawtooth faustSawtooth(48000,8);

void setup() {
  WM8978 wm8978;
  wm8978.init();
  wm8978.addaCfg(1,1);
  wm8978.inputCfg(1,0,0);
  wm8978.outputCfg(1,0);
  wm8978.micGain(30);
  wm8978.auxGain(0);
  wm8978.lineinGain(0);
  wm8978.spkVolSet(0);
  wm8978.hpVolSet(40,40);
  wm8978.i2sCfg(2,0);

  faustSawtooth.start();
}

void loop() {
  faustSawtooth.setParamValue("freq",rand()%(2000-50 + 1) + 50);
  delay(1000);
}
and the resulting firmware should have the same effect as the one presented in the previous C++ tutorial. You can refer to the Configuring the Audio Codec section to get more information of what the WM8978 lines are doing, etc.
2018 Programmable Audio Workshop PAW: Introduction to Faust
Building a Simple MIDI Synthesizer
We are going to build a MIDI synthesizer from scratch (without using the Faust libraries).
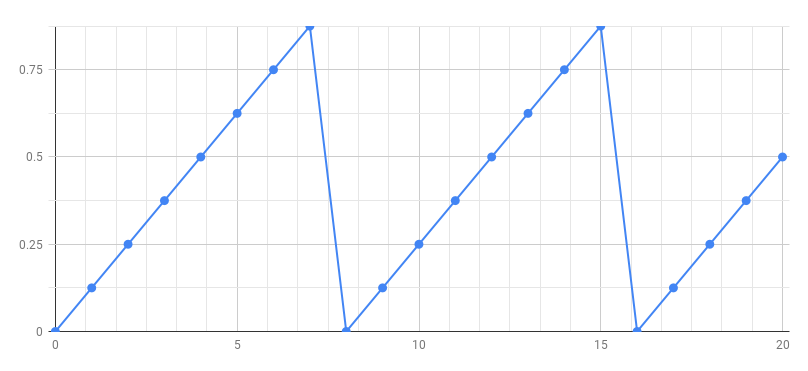
Phase Generator
The first step is to build a phase generator that produces a periodic sawtooth signal between 0 and 1. Here is the signal we want to generate:
Ramp
In order to produce the above signal we need first to produce a ramp signal 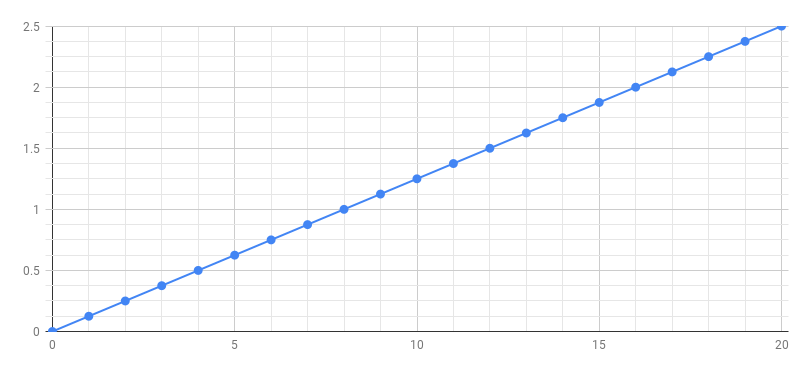
using the following Faust program:

You can think of a Faust program as a description of an audio circuit where 0.125, + and _ are primitives of the language (predefined elementary audio components), and the other two signs: : and ~ are used to connect together these audio components.
Semantics
To understand the above diagram let’s annotate it with its mathematical semantics.

As we can see in the diagram, the formula of the output signal is: \(y(t) = y(t-1) + 0.125\)
We can compute the first values of \(y(t)\):
- \(y(t<0)=0\)
- \(y(0) = y(-1) + 0.125 = 0.125\)
- \(y(1) = y(0) + 0.125 = 2*0.125 = 0.250\)
- \(y(2) = y(1) + 0.125 = 3*0.125 = 0.375\)
- …
- \(y(6) = y(5) + 0.125 = 7*0.125 = 0.875\)
- \(y(7) = y(6) + 0.125 = 8*0.125 = 1.000\)
- \(y(8) = y(7) + 0.125 = 9*0.125 = 1.125\)
- …
Phase Signal
How can we transform the above ramp into sawtooth signal ? By removing the integer part of the samples in order to keep only the decimal (fractional) part (3.14159 -> 0.14159).
Let’s define a function to do that:
decimalpart(x) = x - int(x);We can now use that function to transform our ramp into a sawtooth It is then tempting to write:
process = 0.125 : + ~ _ : decimalpart;From a mathematical point of view that would be perfectly correct, but we will accumulate rounding errors. To keep full precision it is better to place the decimal part operation inside the loop:
process = 0.125 : (+ : decimalpart) ~ _ ;We can now listen the produced signal. Just copy and past decimalpart and process definitions into the Faust editor
Controlling the Frequency of the Phase Signal
Let’s first rearrange our code

In our phase definition the step value, here 0.125 controls the frequency of the generated signal. We would like to compute this step value according to the desired frequency. In order to do the conversion we need to know the sampling rate. It is available from the standard library as ma.SR.
Let say we would like our phase signal to have a frequency of 1 Hz, then the step should be very small 1/ma.SR so that is will take ma.SR samples (i.e. 1 second) for the phase signal to reach 1.
If we want a frequency of 440 Hz, we need a step 440 times bigger for the phase signal to reach 1 440 times faster.
phase = 440/ma.SR : (+ : decimalpart) ~ _ ;We can generalize this definition by replacing 440 by a parameter f:
phase(f) = f/ma.SR : (+ : decimalpart) ~ _ ;and by indicating the desired frequency when we use phase:
process = phase(440);Creating a Sine Wave Oscillator
The next step is to transform above phase generator into a sine wave generator. We will use the sin primitive that computes the sine of x (measured in radians). Therefore we start for the phase signal, we multiply it by \(2\pi\) to obtain radiants, and compute the sine. The full program is the following:

import("stdfaust.lib");
decimalpart(x) = x-int(x);
phase(f) = f/ma.SR : (+ : decimalpart) ~ _ ;
osc(f) = phase(f) * 2 * ma.PI : sin;
process = osc(440);Controlling the Frequency and Gain of the Oscillator
The next step is to add some controls on the frequency and gain of the oscillator. We can replace the fixed frequency 440 by a user interface slider:
process = osc(hslider("freq", 440, 20, 10000, 1));and add a gain to control the output level of the oscillator:
process = osc(hslider("freq", 440, 20, 10000, 1)) * hslider("gain", 0.5, 0, 1, 0.01);Adding a Gate Button
In order to prepare our MIDI synthesizer we need to add a gate button so that the sound is only when we press it:
process = osc(hslider("freq", 440, 20, 10000, 1)) * hslider("gain", 0.5, 0, 1, 0.01) * button("gate");Adding an Envelope Generator
It is a good idea to also add an envelop generator. Here we will use a predefined adsr in the Standard Faust library.

import("stdfaust.lib");
decimalpart(x) = x-int(x);
phase(f) = f/ma.SR : (+ : decimalpart) ~ _ ;
osc(f) = phase(f) * 2 * ma.PI : sin;
process = osc(hslider("freq", 440, 20, 10000, 1))
        * hslider("gain", 0.5, 0, 1, 0.01)
* (button("gate") : en.adsr(0.1,0.1,0.98,0.1));Improving the Timbre
Instead of playing pure sine waves tones, let’s improve the timbre with simple additive synthesis:
timbre(f) = osc(f)*0.5 + osc(f*2)*0.25 + osc(f*3)*0.125;
process = timbre(hslider("freq", 440, 20, 10000, 1))
* hslider("gain", 0.5, 0, 1, 0.01)
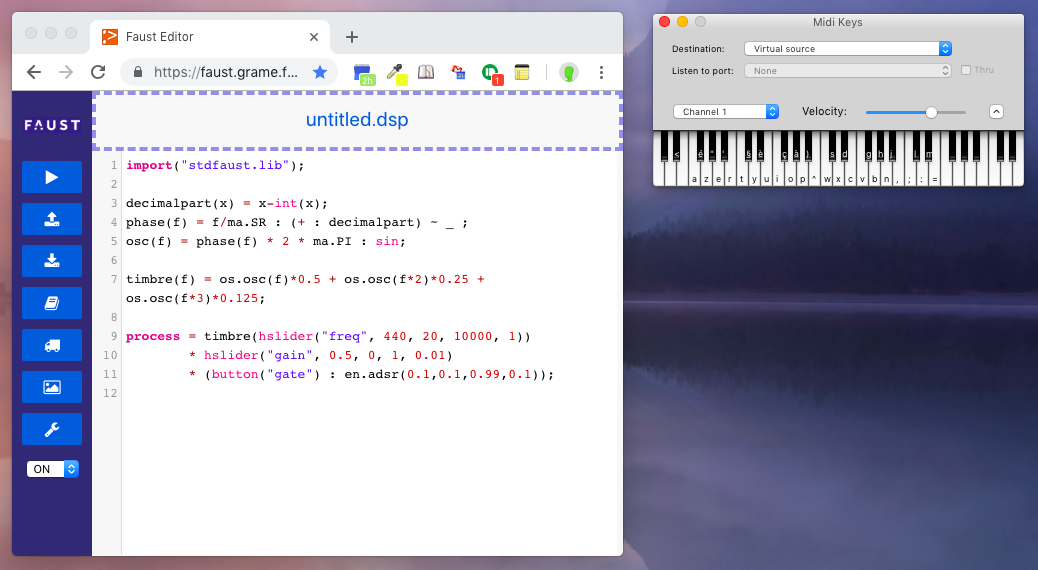
* (button("gate") : en.adsr(0.1,0.1,0.98,0.1));Running as a Polyphonic MIDI Synth
To control the synthesizer using MIDI you need to use Chrome. The polyphonic MIDI mode is activated using the drop down menu.
Adding a Global Effect
A global effect can be added by providing a definition for effect.
// Common effect
effect = dm.zita_light;
import("stdfaust.lib");
decimalpart(x) = x-int(x);
phase(f) = f/ma.SR : (+ : decimalpart) ~ _ ;
timbre(f) = phase(f)*0.5 + phase(f*2)*0.25 + phase(f*3)*0.125;

process = timbre(hslider("freq", 440, 20, 10000, 1))
* hslider("gain", 0.5, 0, 1, 0.01)
* (button("gate") : en.adsr(0.1,0.1,0.98,0.1));

effect = dm.zita_light;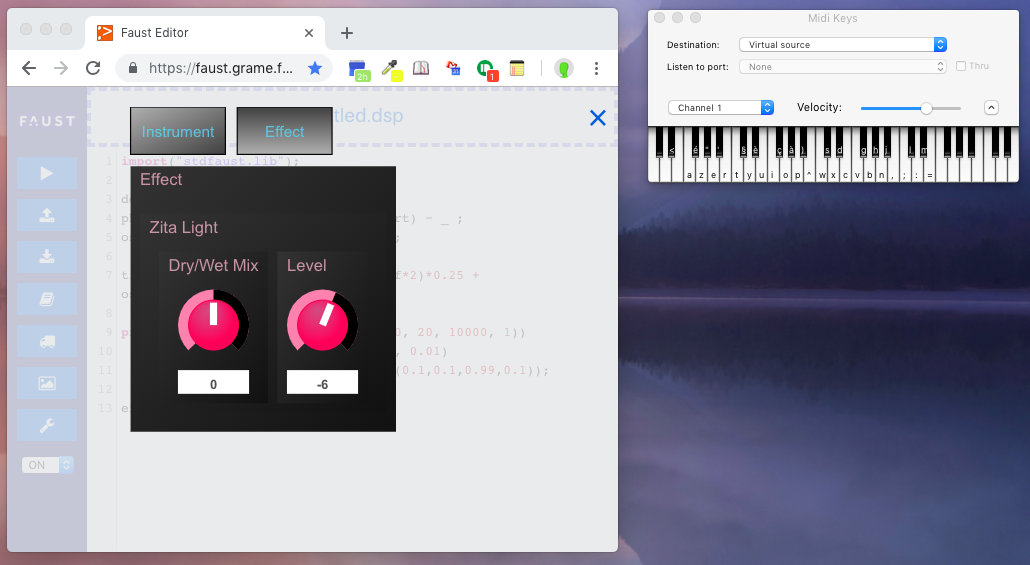
Making a Sine Oscillator From Scratch and Additive Synthesis
Goals
- Implementing a sine oscillator from scratch in Faust
- Understand the relation between the sine function and the generated sound
- Use multiple sine oscillator to implement an additive synthesizer
- Use SmartKeyboard to produce polyphonic mobile apps to control this synth
Sine Function in Faust
- The sine function in Faust works like on a calculator:

will output 0.
To verify this, you could click on the truck (export function) in the Faust web editor and then choose
misc/csvto get a table containing the first n samples output by the program.

will output 1.
Note that
stdfaust.libis imported here in order to usema.pi.

will output 0.
Implementing a Phasor
- What is needed to “print” a full sine wave?
- -> We need to create a series of numbers (vector) going from 0 to 2pi, in other words, draw a line.
- First let’s create a “counter” in Faust:

Don’t forget that you can always print the output of a Faust program by using the in the Faust web editor
misc/csv
- The current counter counts one by one. Instead we’d like to count slower 0.01 by 0.01.

- Now, we want to reset the counter back to 0 when it reaches 1. This can be done easily using the
ma.decimalfunction:

Note the use of
ma.decimalin the loop here to prevent numerical errors.
- Try to run the program (play button in the editor) and it should make sound! What are we generating here?
- -> A sawtooth wave.
- How do we change the pitch of the sawtooth wave? -
We should increment the counter faster or slower. Try different values (e.g., 0.001, 0.1, etc.).
- Instead of controlling the increment of the counter, we’d like to control the frequency of the sawtooth wave.
- To do that, we need to know the number of values of the wave processed by the computer in one second. That’s what we call the sampling rate. This value changes in function of the context of the program so it can be retrieved with
ma.SR. - A sampling rate of 44100 corresponds to a frequency of 44100Hz. If we want a frequency of 440, what increment do we need to put in our counter?
- ->
freq/ma.SR
- ->
- In the end, we get:

- A this point feel free to plot the output of the Faust program using
misc/csvin the export function of the online editor. - The
freqparameter can be controlled dynamically:

import("stdfaust.lib");
freq = hslider("freq",440,50,2000,0.01);
process = (+(freq/ma.SR) ~ ma.decimal);- The code can be cleaned up by placing our phasor in a function:

import("stdfaust.lib");
f = hslider("freq",440,50,2000,0.01);
phasor(freq) = (+(freq/ma.SR) ~ ma.decimal);
process = phasor(f);Generating a Sine Wave
- Almost there! Now we want our phasor to go from 0 to 2pi so that we can plug it to the
sinfunction:

import("stdfaust.lib");
f = hslider("freq",440,50,2000,0.01);
phasor(freq) = (+(freq/ma.SR) ~ ma.decimal);
osc(freq) = sin(phasor(freq)*2*ma.PI);
process = osc(f);Note that we created an
oscfunction in order to have a cleaner code.
Additive Synthesis
- A sine wave generates what we call a pure tone. More complex sounds can be produced by adding multiple sine waves together to create harmonics. The frequency and the gain of each harmonic will determine the timbre of the sound. Using this technique, it is possible to “sculpt” a sound.
- A simple organ synthesizer can be implemented using additive synthesis:

import("stdfaust.lib");
f = hslider("freq",440,50,2000,0.01);
phasor(freq) = (+(freq/ma.SR) ~ ma.decimal);
osc(freq) = sin(phasor(freq)*2*ma.PI);
organ(freq) = (osc(freq) + osc(freq*2) + osc(freq*3))/3;
process = organ(f)/3;- This is what we call a harmonic series.
Making a Synthesizer
- In order to use this synthesizer with a keyboard, we need to be able to turn the sound on and off and also to control its volume:

import("stdfaust.lib");
f = hslider("freq",440,50,2000,0.01);
g = hslider("gain",1,0,1,0.01);
t = button("gate");
phasor(freq) = (+(freq/ma.SR) ~ ma.decimal);
osc(freq) = sin(phasor(freq)*2*ma.PI);
organ(freq) = (osc(freq) + osc(freq*2) + osc(freq*3))/3;
process = organ(f)*g*t/3;- An envelope could be added to make it sound more natural:

import("stdfaust.lib");
f = hslider("freq",440,50,2000,0.01);
g = hslider("gain",1,0,1,0.01);
t = si.smoo(button("gate"));
phasor(freq) = (+(freq/ma.SR) ~ ma.decimal);
osc(freq) = sin(phasor(freq)*2*ma.PI);
organ(freq) = (osc(freq) + osc(freq*2) + osc(freq*3))/3;
process = organ(f)*g*t/3;- This synth can be controlled with a midi keyboard.
Turn it Into an Android App
- Use the export function of the Faust editor and choose
android/smartkeybinstall the app on the phone and have fun! - This could also be turned into an app always making sound and controllable with accelerometers:
import("stdfaust.lib");
f = hslider("freq[acc: 0 0 -10 0 10]",1000,50,2000,0.01) : si.smoo;
phasor(freq) = (+(freq/ma.SR) ~ ma.decimal);
osc(freq) = sin(phasor(freq)*2*ma.PI);
organ(freq) = (osc(freq) + osc(freq*2) + osc(freq*3))/3;
process = organ(f)/3;- In that case, export with
android/android.